.jpg?width=1200&height=600&name=portrait-of-a-happy-man-with-smart-phone-and-laptop-indoors-picture-id1251314149%20(2).jpg)


So, you’ve just registered for HubSpot — either a free or paid plan — and now you need to get it up and running. It's not an easy task, and it can feel overwhelming at first.
This handy guide will take you through the HubSpot CRM setup process so that you and your sales team can start using HubSpot CRM effectively, without delay.
What’s in this guide:
- How to set up a HubSpot CRM?
- General setup
- Deals
- Importing data
- Reporting
Remember: HubSpot CRM comes in a number of formats ranging from free CRM to £98/€110 p/month p/user.
- Free: HubSpot CRM
- Entry-level: HubSpot Sales Hub Starter
- Standard-level: HubSpot Sales Hub Professional
- All the bells and whistles: HubSpot Sales Hub Enterprise
If you want to get to grips with what's in HubSpot Free CRM vs. HubSpot paid CRM, click over to this guide that covers the differences in-depth.
How to set up a HubSpot CRM?
Before we get into the details of setting up your shiny new CRM, let's cover the basics of HubSpot first. This will help you to get familiarised with the system and how to find everything you need.
![]()
Navigation
The navigation bar at the top of the HubSpot portal houses all the links to getting around. Below, we'll go through the details of each tab on your navigation bar.
Contacts
Within the contacts tab, you can navigate to your full database of contacts, companies, calls, lists and target accounts. You can also access the activity feed, which displays all activities associated with your contacts on a timeline.
Conversations
This is HubSpot’s Live chat tool, where you can also set up automated responses to your website visitors.
Marketing
This tab is where marketers will spend most of their time. From here, you can create ads for social media and Google; create emails for specific lists or automation; build and manage landing pages, blogs and SEO for your website; monitor your social channels and schedule content posts. In addition, you can set up campaigns, lead capture mechanics and plan and organise your strategy.
Sales
The sales tab is the hub for all sales activities. Here sales reps can create and manage their deals within their pipelines; create and retrieve quotes; assign and complete tasks and set up meeting links. Sales heads can create forecasts and set up playbooks/ documentation for sales reps to follow and refer back to.
Automation
The automation tab contains sequences and workflows. Sequences are automated sales emails your sales reps can set up to nurture and follow up with leads automatically for prompt and relevant emails. Workflows are in-depth automation for all aspects of the CRM, email communications and sales journey.
Reports
Here you will find reports and dashboards of all activities and data integrated with your HubSpot CRM. These reports can be built using standard prebuilt templates or custom-built to your needs.
Marketplace
The marketplace is where you can find all the apps and tools you use that can be integrated with HubSpot CRM.
Settings
All the settings to manage the workings of your CRM are housed here. These settings range from your profile to your business settings. Here you can add properties and rules that reflect across the entire portal.
Step 1: General setup
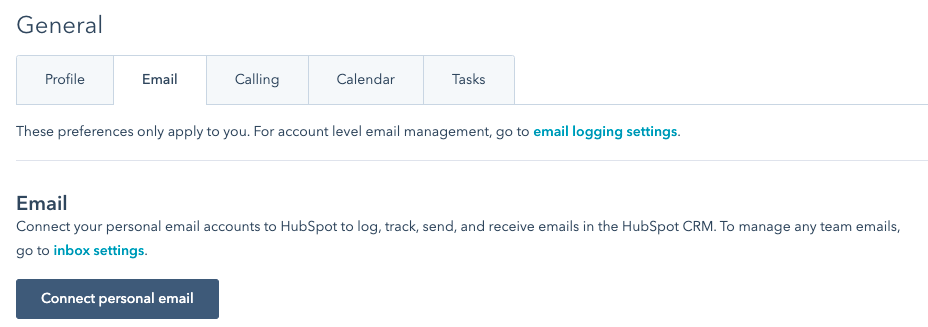
Connecting your email
Connect your email address to have your emails pull into HubSpot and track opens, replies and add them to your contact and deal records. To do this, you’ll need to download the HubSpot Gmail/Outlook extension. Once connected, you can pull your emails into HubSpot and access HubSpot CRM data directly in Gmail/Outlook.
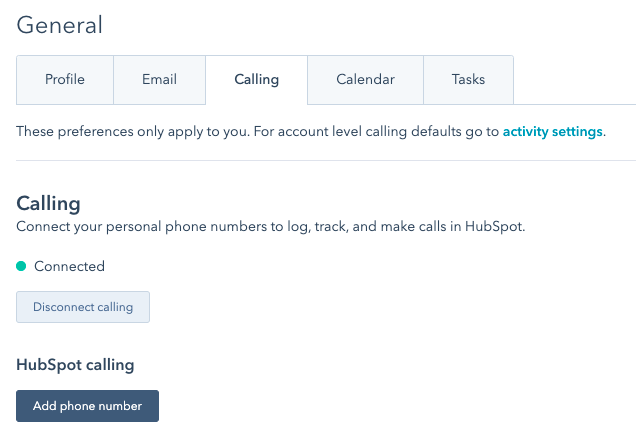
Calls
Connect your phone number, office number or VOIP phone to track and initiate calls from within HubSpot. This is a great way to track your sales activities. This can be done by simply entering your phone number or by using one of their integrations.
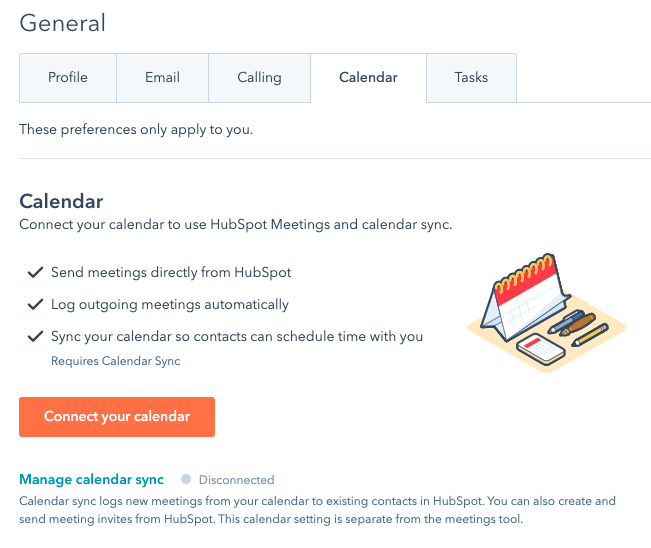
Calendar
Calendar sync logs new meetings from your calendar to existing contacts in HubSpot. You can also create and send meeting invites from HubSpot.
Notifications
HubSpot gives you full access to customise the way you receive notifications about activity within your portal as well as the type of notifications you’d like to receive. Notifications can be received through email, your desktop, third-party tools and the mobile app.
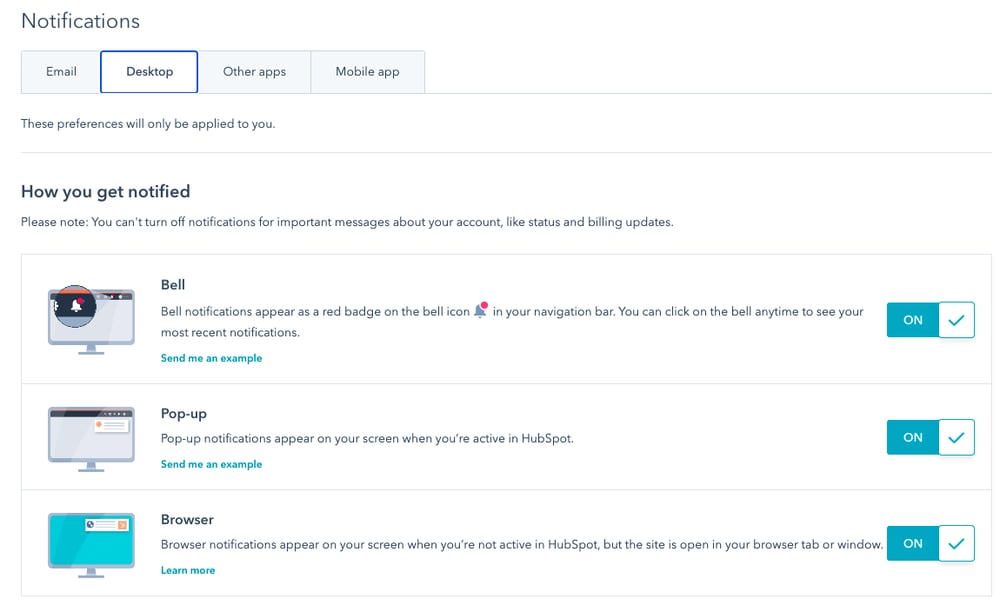
Custom notifications can also be created in workflows to send internal notifications to specific users, teams or owners about a custom contact, automation, email or deal activity.
Account defaults
Here you can add your account and domain name and enter your company details, which will reflect across the platform where needed. You will also need to set up your preferred currency(s), branding and user defaults.
Managing users and teams
Adding users and assigning them to teams is an essential step in setting up your portal. Here you can add the various users of the portal and assign them to the teams for organisational, reporting, and partitioning purposes. You will be able to set up the individual or team specific roles and the access each will have.
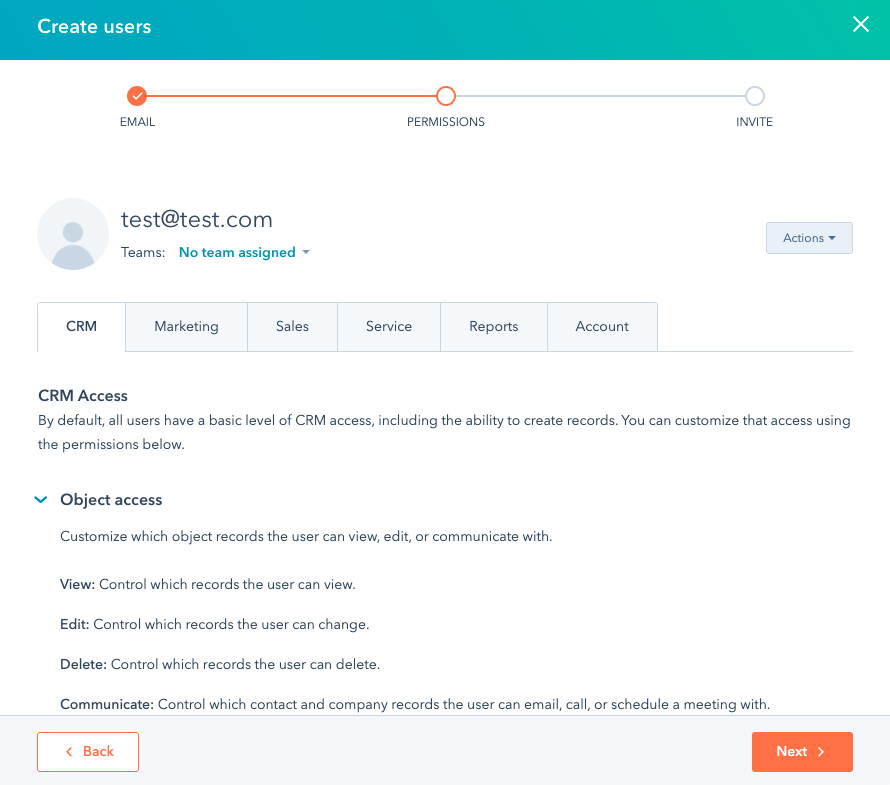
To add a user follow these steps:
- On the top right of the 'users tab' select create user.
- Assign a role to that user and the permissions they will have. These defaults can be saved but require an Enterprise or Sales Pro HubSpot plan.
Depending on your plan, you can also bulk import your teams with a .csv file which will let you assign access to each new user quickly.
Should anything change and your reps require fewer or more rights, they can be edited at any point. Super Admins have access to every setting so be very specific with the users you give this status.
Step 2: Tracking and analytics
Website tracking
Adding website tracking is simple. Head to the tracking code section and send your website developer the displayed code to the header of the site. If you have a WordPress website, you can simply install the HubSpot plugin and enter the code displayed to connect it to your portal.
![]()
With the tracking code enabled you will be able to monitor lead, prospect and customer activities on your website. This will assist your sales and marketing teams with invaluable details for prompt and relevant communications.
Tracking revenue targets
To track the revenue targets of your sales reps you will need to create goals. Depending on your HubSpot plan, you may only have access to revenue goals. Set these goals to track your sales reps level of achievement each month. These goals can be set differently or the same per month.
Step 3: Deals
For sales, deals are the most important aspect of HubSpot CRM. These deals contain all the contact and business details associated with that deal as well as any activities related to that deal in one place. This makes it easy for a sales rep to manage every aspect of the deal.
Deals sit within your sales pipeline, which is built up of deal stages your business process follows to close a deal.
The Deal Pipeline
Note: The number of pipelines you can work in is determined by your plan.
Free - 1 Pipeline
Starter - 2 Pipelines
Pro - 15 Pipelines
Enterprise - 100 Pipelines
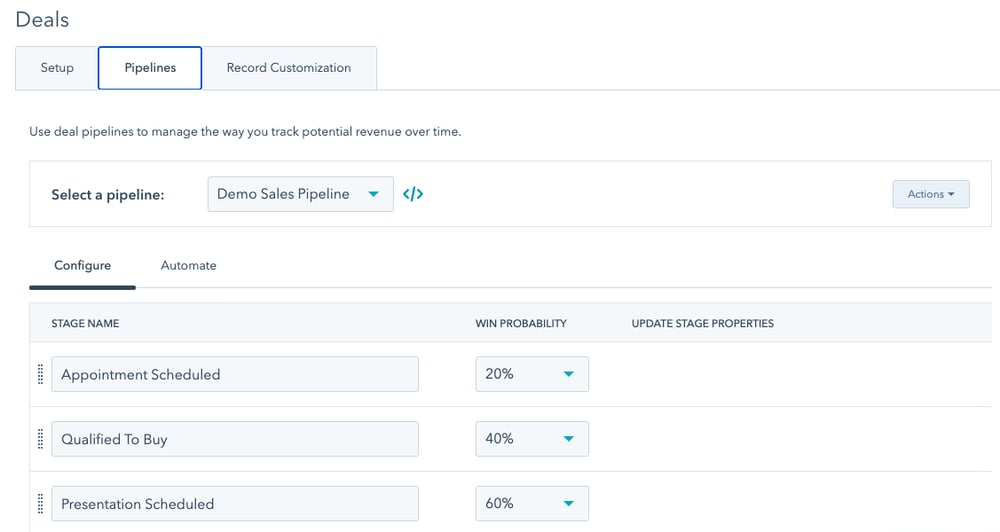
Initially, you will have the default sales pipeline but it can be edited to suit your needs with custom stages and automation. Start by editing the deals setting to manual entry (available on all plans), the next tab, Pipelines, is where you can add or edit existing pipelines. Each pipeline stage needs to fit the processes in your business.
Stages:
Should you need to have certain fields filled in at certain stages, it is possible to make them required when updating a contact to a new stage. This can be done within the pipeline settings and by editing the properties.
- Navigate to Data Management> Objects > Deals > Pipelines
- Update the stages within your pipeline to match your business processes
- Select edit properties on a stage you want to make properties required for
- Select or add the properties you want to be required before moving to the new stage.
Adding deals
In a contact record or a pipeline, click add a deal. Here you can add all the details about the deal, custom included.
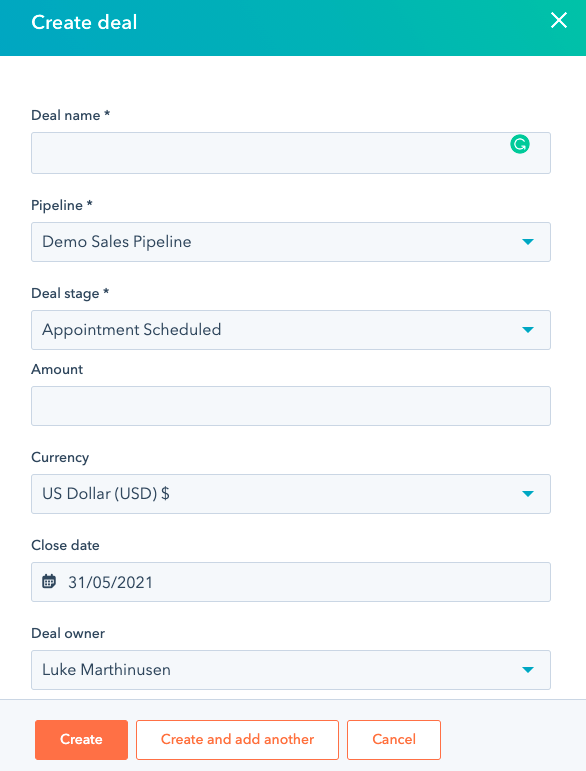
Fields:
There are many default properties you can fill in to associate with a deal, or you can create a custom field. These fields can be formatted to dates, checkboxes, dropdowns and many more to suit your specific needs.
Once created, you will be presented with the deal view. Here you can see the activity, notes, tasks and meetings associated with the deal.
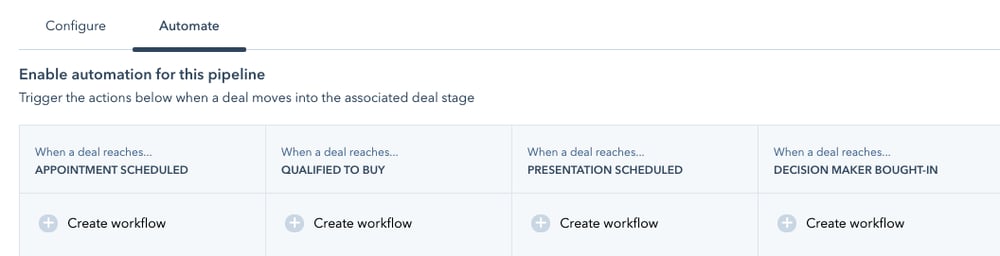
Automating your pipeline
As deals enter and move within your pipeline, workflows can be triggered by their stage. These workflows can send emails to the contacts associated with the deal, notifications to the sales rep owner and update the records throughout.
To set up pipeline stage automation, switch to the automate tab and add in the automated steps under each stage in your pipeline.
Lead rotation
As leads come in you may want to rotate them between your different sales reps. This can be done through a workflow.
- Open workflows
- Create a new workflow
- Create from a template and select assign new web leads
- Refine the enrolment criteria, for example when a contact has to submit any form on the website
- Assign the action and rotate the record to the owner. Then assign the owners or teams to rotate between.
Speed up your follow-up time
Your sales representative should action the assigned lead within your set response time goals but if you find or are concerned they may be delayed, adding these steps in the above workflow will reassign the lead to a new owner/team should they not make contact within a certain amount of time.
- Add a delay step with the amount of time you want a response by.
- Add an if/then branch with the one condition that the lead status is unknown. This means that if the lead status is unknown, one can proceed to the next step.
- Then add another assign action, but check the box ‘overwrite if contact has an existing owner’ to assign a new owner.
- Import your contacts, companies and deals into HubSpot
Contacts
These are the people you will be in contact with. They will form your leads, prospects and customers. A Contact record will store information like First Name, Last Name, Email, and Phone Number. Contact records can also have custom fields of information that suits your business needs and will also include a history of when and who last contacted them.
Companies
These are the businesses associated with the contacts you are working with. These records can be associated with multiple contacts working at the same company and will store information like Name, Domain, Industry, and Phone Number.
Deals
Deals are used to manage your sales process and track the revenue associated with a potential sale. These deals will move through the various stages in your sales pipeline(s) and are associated with the main contacts sales reps are in contact with to close the deal. Deals will store information like the amount, expected close date and deal activities with the sales reps.
Step 4: Importing data into HubSpot
HubSpot provides multiple methods to import your historical data from your different data points. Whether you were using another CRM or spreadsheets, HubSpot has easy-to-use tools to help you migrate your data to one central location.
In addition, HubSpot automatically populates new contact, company, and deal records with details from its database of over 20 million businesses.
Data can be added through a file upload, your existing CRM connection, third-party system, HubSpot technical consultant/ HubSpot partner or API integration. If you need help migrating your data to HubSpot, book a call with us.
1. File upload
This is the least technical route that requires your records to be in a file with the required fields.

Follow these steps to import your contacts, companies or deals:
- In your HubSpot account, navigate to your contacts, companies or deals.
- In the upper right, click Import.
- Click Start an import.
- Select 'File from computer', then click Next.
- Select One file, then click Next.
- Select One object, then click Next.
- Select the object in your import file.
- Click choose a file and in the dialogue box, select your import file. Select the checkbox if you're using the object ID to duplicate your contacts, companies or deals. In the bottom right, click Next.
The next stage is mapping the fields in your file to the fields in your HubSpot account. Next to each line item, select the field that matches. Should the field not exist, start typing its name and select create a new property to create the new field.
Next, follow the steps presented to set up your options for the import and click finish import.
2. HubSpot integrations
HubSpot has built many integrations that help you connect your previous CRM or data source to HubSpot and initiate a data sync. Depending on the CRM you were using, the process may vary slightly. But for the most part, they are very similar.
Head to the HubSpot Marketplace and search for the CRM or system you would like to import from. Then install the integration and sign in. Here is where things can be different, but here you can find the instructions to sync SalesForce, Google Contacts, Drip, Campaign Monitor, ActiveCampaign and Mailchimp. See all data sync apps here.
3. Third-party systems
Alternative options are available to migrate your data with companies like Import2 and Data2CRM.
4. HubSpot technical consultant/ partner
You can contact a local HubSpot partner in your region that can help you with data migration. MO Agency is one such partner, so reach out if you need a hand.
5. API integration
This is the most technical method but if you have a development team, they can connect your custom sources and databases to sync with HubSpot directly. You can view their API documentation here.
Data clean up
Sometimes imports can pull in messy data with inconsistencies and fixing them can be quite a lengthy process if done manually. Thankfully HubSpot has a new Operation Hub, which brings in automation that can clean your data for you.
Reporting
Collecting data is only one piece of the puzzle. The true value of data comes from reporting, which enables a business to make more informed decisions. HubSpot has report templates that have limited editing capabilities but are a quick way to get your data into workable reports. Custom reports can be built based on your custom fields and data needs.
Reports
To build a report navigate to reports. Here you will see all your existing reports, their owners and the dashboards they are featured in. Creating a report is easy. To create one from an existing template, select report library and select one from the extensive list. If you don’t see the report you’re looking for or you want to build one based on custom fields, you’ll need to create a custom report.
Dashboards
Consists of multiple reports for you to monitor all aspects of your sales process in one easily customisable dashboard. Dashboards can be set up for individuals or shared among teams. Should you have sensitive data you don’t wish to share, you can manage who has access to each dashboard.
Final Thoughts
There you have it, your HubSpot CRM should be all setup and ready to use. As you and your team use it, you’ll discover new and better ways to customise the portal to your needs and make it an extension of your sales teams. If you still need help setting up your HubSpot CRM after reading this guide, get in touch with MO Agency. We're HubSpot support pros. We’d be delighted to help you take your sales to the next level!